")
 This tutorial will serve as an introduction to creating a mosaic like effect inside illustrator , end result possibilities are endless But here is the Basic technique of creating a mosaic effect.
Introduction to Mosaic Tool
It is just a filter which can be reached from
Choose Filter > Create > Object Mosaic
remember when creating mosaic Imoported image must be embedded , not linked .You can use illustrations to create mosaic objects but you will need to export it as an image ie jpg from illustrator then import it and embed it before applying the filter.
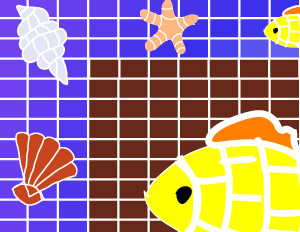
Preview

Step 1
Creating Elements
I have decided to create a frame of mosaic which can also be placed around any of the artworks. For this i need to prepare the elements . I started off by creating and drawing simple shapes in a related theme using pencil tool. I Kept the strokes rough and sketchy intentionally.

Step 2
Creating Fame
Second element i create is a frame . I created a rectangle frame ie
created a rectangle placed a new rectangle on top this one of smaller size and use path finder to subtract the top one. Gave it a gradient.

And then exported it as a JPG > here is the frame!

Step 3
Applying filter.
I created a new document and imported and embedded the frame into it.
File > Place > Browse to the frame , make sure the Linking is unchecked!
Next apply the filter
- Select the image.
- Choose Filter > Create > Object Mosaic.
Here is a detail of what options you will find

- If you want to change the dimensions of the mosaic, enter values for New Size.
- Set options to control the spacing between tiles and the total number of tiles, along with any other additional options, and click OK:
- Constrain Ratio
- Locks the width or height dimensions to those of the original bitmap image. Width calculates the appropriate number of tiles to use for the width of the mosaic, based on the original number of tiles for the width. Height calculates the appropriate number of tiles to use for the height of the mosaic, based on the original number of tiles for the height.
- Result
- Specifies whether the mosaic tiles are color or grayscale.
- Resize Using Percentages
- Changes the size of the image by percentages of width and height.
- Delete Raster
- Deletes the original bitmap image.
- Use Ratio
- Makes the tiles square, using the number of tiles specified in Number Of Tiles. This option is located below the Cancel button.
I used the options as shown and got the outcome as

Step 4
Applying Stroke
Now i applied a white stroke to the converted squares.

And placed the other elements that i created randomly over the entire frame.
For the inner squares colouring select a single one go to
Select > same >Fill and Stroke . and give a fill colour of your choice.
Preview!
Here is the final Preview!
[private][download#8][/private]
 Printables, graphics, backgrounds, vectors, illustrations, fonts, and design elements given on this site are for personal use only. You may not alter them or redistribute them for free or monetary gain without written consent from the author, Asma Murad. If you want to share these resources with others, please share the link to the blog post. Teachers/educators: You may share these with your classes and colleagues as long as they are not edited in any way, Cliparts & Resources shared for free are not to be used as printables for sale.
Related posts:
 Exporting animated SWF files from illustrator
Tutorial :-An intro to mesh tool
Create a Disco Environment with Twirl Tool, Crystalize , and Envelope Tool- Part 1
Create a Detailed Vector Traffic Light with Simple Shapes, Gradients, and Glows
An expressive shining eye tutorial :Part 1
Create a Cool Air Balloon Wallpaper
Exporting animated SWF files from illustrator
Tutorial :-An intro to mesh tool
Create a Disco Environment with Twirl Tool, Crystalize , and Envelope Tool- Part 1
Create a Detailed Vector Traffic Light with Simple Shapes, Gradients, and Glows
An expressive shining eye tutorial :Part 1
Create a Cool Air Balloon Wallpaper
